Serveur de mail
Posted on sam. 24 novembre 2018 in Sytem
Pour tester votre serveur de mail, vous pouvez utiliser ce site internet : http://www.mail-tester.com. Si tout est bien configuré, vous devriez atteindre un score proche de 10.
Le serveur web utilisé ici est nginx. Vous pouvez tout à fait utiliser Apache2 ou lighttpd à condition d'adapter les configurations web.
Les utilisateurs et les mails étant stockés en base de données, il vous avoir un serveur MySQL/MariaDB fonctionnel sur votre serveur.
Si vous souhaitez ajouter une interface web (client webmail) au serveur de mail, vous pouvez suivre la procédure ici.
domain.tld est le nom de domaine à ajouter.
Architecture
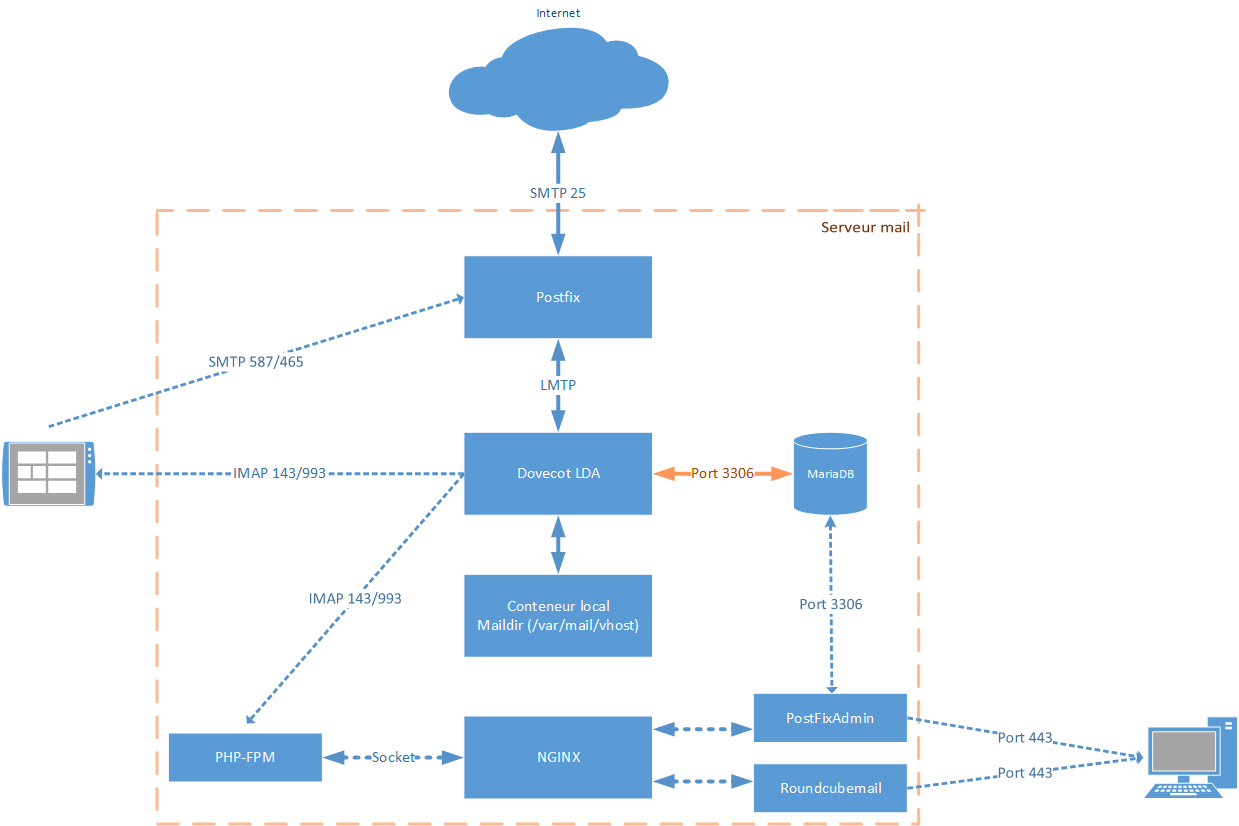
Envoie

Réception

Postfix
apt-get install postfix postfix-mysql
mysql -u root -p
CREATE database postfix;
CREATE USER 'postfix'@'localhost' IDENTIFIED BY 'MOT DE PASSE';
GRANT USAGE ON *.* TO 'postfix'@'localhost';
GRANT ALL PRIVILEGES ON postfix.* TO 'postfix'@'localhost';
Mappage avec MySQL
Domaines
# vim /etc/postfix/mysql-virtual-mailbox-domains.cf
hosts = 127.0.0.1
user = postfix
password = MOT DE PASSE
dbname = postfix

query = SELECT domain FROM domain WHERE domain='%s' and backupmx = 0 and active = 1
Boites mail
# vim /etc/postfix/mysql-virtual-mailbox-maps.cf
hosts = 127.0.0.1
user = postfix
password = MOT DE PASSE
dbname = postfix

query = SELECT maildir FROM mailbox WHERE username='%s' AND active = 1
Alias
# vim /etc/postfix/mysql-virtual-alias-maps.cf
hosts = 127.0.0.1
user = postfix
password = MOT DE PASSE
dbname = postfix

query = SELECT goto FROM alias WHERE address='%s' AND active = 1
Génération SSL/TLS
Il est possible de le faire maintenant avec Let's Encrypt.
Vous pouvez passer cette étape si vous posséder déjà le certificat et la clé pour activer le SSL/TLS sur le domaine (certificat StartSLL ou payant).
Des questions vous seront posées durant les lignes de commandes suivantes. Vous pouvez renseigner avec les informations que vous souhaitez (elles apparaîtront ensuite dans le certificat).
cd /etc/ssl/
# Génération des fichiers
openssl genrsa -out ca.key.pem 4096
openssl req -x509 -new -nodes -days 1460 -sha256 -key ca.key.pem -out ca.cert.pem
openssl genrsa -out mailserver.key 4096
openssl req -new -sha256 -key mailserver.key -out mailserver.csr
openssl x509 -req -days 1460 -sha256 -in mailserver.csr -CA ca.cert.pem -CAkey ca.key.pem -CAcreateserial -out mailserver.crt
# Droits sur les fichiers
chmod 444 ca.cert.pem
chmod 444 mailserver.crt
chmod 400 ca.key.pem
chmod 400 mailserver.key
# Déplacement dans les dossiers
mv ca.key.pem private/
mv ca.cert.pem certs/
mv mailserver.key private/
mv mailserver.crt certs/
Fichiers de configuration
mv /etc/postfix/main.cf /etc/postfix/main.cf.bak
cp /etc/postfix/master.cf /etc/postfix/master.cf.bak
/etc/postfix/main.cf
############
# GENERALS SETTINGS #
############

smtpd_banner         = $myhostname ESMTP $mail_name (Debian/GNU)
biff                 = no
append_dot_mydomain  = no
readme_directory     = no
delay_warning_time   = 4h
mailbox_command      = procmail -a "$EXTENSION"
recipient_delimiter  = +
disable_vrfy_command = yes
message_size_limit   = 502400000
mailbox_size_limit   = 1024000000

inet_interfaces = all
inet_protocols = ipv4

myhostname    = hostname.domain.tld
myorigin      = hostname.domain.tld
mydestination = localhost localhost.$mydomain
mynetworks    = 127.0.0.0/8 [::ffff:127.0.0.0]/104 [::1]/128
relayhost     =

alias_maps     = hash:/etc/aliases
alias_database = hash:/etc/aliases

##########
# TLS PARAMETERS #
##########
# Smtp ( OUTGOING / Client )
smtp_tls_loglevel            = 1
smtp_tls_security_level      = may
smtp_tls_CAfile              = /etc/ssl/certs/ca.cert.pem
smtp_tls_protocols           = !SSLv2, !SSLv3
smtp_tls_mandatory_protocols = !SSLv2, !SSLv3
smtp_tls_mandatory_ciphers   = high
smtp_tls_exclude_ciphers     = aNULL, eNULL, EXPORT, DES, 3DES, RC2, RC4, MD5, PSK, SRP, DSS, AECDH, ADH
smtp_tls_note_starttls_offer = yes

# ---------------------------------------------------------------------------------------------------

# Smtpd ( INCOMING / Server )
smtpd_tls_loglevel            = 1
smtpd_tls_auth_only           = yes
smtpd_tls_security_level      = may
smtpd_tls_received_header     = yes
smtpd_tls_protocols           = !SSLv2, !SSLv3
smtpd_tls_mandatory_protocols = !SSLv2, !SSLv3
smtpd_tls_mandatory_ciphers   = medium

# Infos (voir : postconf -d)
# Medium cipherlist = aNULL:-aNULL:ALL:!EXPORT:!LOW:+RC4:@STRENGTH
# High cipherlist   = aNULL:-aNULL:ALL:!EXPORT:!LOW:!MEDIUM:+RC4:@STRENGTH

# smtpd_tls_exclude_ciphers   = NE PAS modifier cette directive pour des raisons de compatibilité
#                               avec les autres serveurs de mail afin d'éviter une erreur du type
#                               "no shared cipher" ou "no cipher overlap" puis un fallback en
#                               plain/text...
# smtpd_tls_cipherlist        = Ne pas modifier non plus !

smtpd_tls_CAfile              = $smtp_tls_CAfile
smtpd_tls_cert_file           = /etc/ssl/certs/mailserver.crt
smtpd_tls_key_file            = /etc/ssl/private/mailserver.key
smtpd_tls_dh1024_param_file   = $config_directory/dh2048.pem
smtpd_tls_dh512_param_file    = $config_directory/dh512.pem

tls_preempt_cipherlist = yes
tls_random_source      = dev:/dev/urandom

smtp_tls_session_cache_database  = btree:${data_directory}/smtp_scache
smtpd_tls_session_cache_database = btree:${data_directory}/smtpd_scache
lmtp_tls_session_cache_database  = btree:${data_directory}/lmtp_scache

# ----------------------------------------------------------------------

###########
# SASL PARAMETERS #
###########

smtpd_sasl_auth_enable          = yes
smtpd_sasl_type                 = dovecot
smtpd_sasl_path                 = private/auth
smtpd_sasl_security_options     = noanonymous
smtpd_sasl_tls_security_options = $smtpd_sasl_security_options
smtpd_sasl_local_domain         = $mydomain
smtpd_sasl_authenticated_header = yes

broken_sasl_auth_clients = yes

###############
# VIRTUALS MAPS PARAMETERS #
###############

virtual_uid_maps        = static:5000
virtual_gid_maps        = static:5000
virtual_minimum_uid     = 5000
virtual_mailbox_base    = /var/mail
virtual_transport       = lmtp:unix:private/dovecot-lmtp
virtual_mailbox_domains = mysql:/etc/postfix/mysql-virtual-mailbox-domains.cf
virtual_mailbox_maps    = mysql:/etc/postfix/mysql-virtual-mailbox-maps.cf
virtual_alias_maps      = mysql:/etc/postfix/mysql-virtual-alias-maps.cf

###########
# ERRORS REPORTING #
###########

# notify_classes = bounce, delay, resource, software
notify_classes = resource, software

error_notice_recipient     = admin@domain.tld
# delay_notice_recipient   = admin@domain.tld
# bounce_notice_recipient  = admin@domain.tld
# 2bounce_notice_recipient = admin@domain.tld

#########
# RESTRICTIONS #
#########

smtpd_recipient_restrictions =
     permit_mynetworks,
     permit_sasl_authenticated,
     reject_non_fqdn_recipient,
     reject_unauth_destination,
     reject_unknown_recipient_domain,
     reject_rbl_client zen.spamhaus.org

smtpd_helo_restrictions =
     permit_mynetworks,
     permit_sasl_authenticated,
     reject_invalid_helo_hostname,
     reject_non_fqdn_helo_hostname
     # reject_unknown_helo_hostname

smtpd_client_restrictions =
     permit_mynetworks,
     permit_inet_interfaces,
     permit_sasl_authenticated
     # reject_plaintext_session,
     # reject_unauth_pipelining

smtpd_sender_restrictions =
     reject_non_fqdn_sender,
     reject_unknown_sender_domain
/etc/postfix/master.cf
smtp  inet  n       -       -       -       -       smtpd
submission inet n       -       -       -       -       smtpd
  -o syslog_name=postfix/submission
  -o smtpd_tls_dh1024_param_file=${config_directory}/dh2048.pem
  -o smtpd_tls_security_level=encrypt
  -o smtpd_sasl_auth_enable=yes
  -o smtpd_client_restrictions=permit_sasl_authenticated,reject
Masquer les infos
# vim /etc/postfix/header_checks
/^Received:.*with ESMTPSA/  IGNORE
/^X-Originating-IP:/        IGNORE
/^X-Mailer:/                IGNORE
/^User-Agent:/              IGNORE
# vim /etc/postfix/main.cf
mime_header_checks = regexp:/etc/postfix/header_checks
header_checks = regexp:/etc/postfix/header_checks
Redémarrage de postfix pour prendre en charge les modifications
postmap /etc/postfix/header_checks
postfix reload
Postfixadmin
Postfix Admin est une interface web permettant la gestion des boites mails, alias et utilisateur virtuels de Postfix. On peut également changer un mot de passe pour une adresse mail depuis cette console.
apt-get install php5-imap
cd /var/www
wget http://downloads.sourceforge.net/project/postfixadmin/postfixadmin/postfixadmin-2.93/postfixadmin-2.93.tar.gz
tar -xzf postfixadmin-2.93.tar.gz
mv postfixadmin-2.93 postfixadmin
rm -rf postfixadmin-2.93.tar.gz
chown -R www-data:www-data postfixadmin
# vim /var/www/postfixadmin/config.inc.php
$CONF['configured'] = true;
$CONF['default_language'] = 'fr';
$CONF['database_type'] = 'mysqli';
$CONF['database_host'] = 'localhost';
$CONF['database_user'] = 'postfix';
$CONF['database_password'] = 'MOT DE PASSE';
$CONF['database_name'] = 'postfix';
$CONF['admin_email'] = 'admin@domain.tld';
$CONF['domain_path'] = 'YES';
$CONF['domain_in_mailbox'] = 'NO';
$CONF['fetchmail'] = 'NO';
Création du sous-domaine sur nginx :
server {
   listen 80;
   server_name     postfixadmin.domain.tld;
   root            /var/www/postfixadmin;
   index           index.php;
   charset         utf-8;

   location / {
      try_files $uri $uri/ index.php;
   }

   location ~* \.php$ {
        include       /etc/nginx/fastcgi_params;
        fastcgi_pass  unix:/var/run/php5-fpm.sock;
        fastcgi_index index.php;
        fastcgi_param SCRIPT_FILENAME $document_root$fastcgi_script_name;
   }
}
On redémarre nginx pour prendre en charge le nouveau sous-domaine :
service nginx restart
Vous pouvez vous rendre maintenant sur l'url de votre sous-domaine pour configurer Postfix Admin via un navigateur web : http://postfixadmin.domain.tld/setup.php
Il va vous donner un hash qu'il faut renseigner :
# vim /var/www/postfixadmin/config.inc.php
$CONF['setup_password'] = 'HASH';
 Dovecot
Dovecot est un serveur IMAP et POP3 pour les systèmes d'exploitation UNIX et dérivés, conçu avec comme premier but la sécurité. Dovecot est distribué en double licence MIT et GPL version 2.
apt-get install dovecot-core dovecot-imapd dovecot-lmtpd dovecot-mysql
SSL/TLS
# vim /etc/dovecot/conf.d/10-ssl.conf
ssl = required
ssl_cert = </etc/ssl/certs/mailserver.crt
ssl_key = </etc/ssl/private/mailserver.key
ssl_protocols = !SSLv2 !SSLv3
ssl_cipher_list = ALL:!aNULL:!eNULL:!LOW:!MEDIUM:!EXP:!RC2:!RC4:!DES:!3DES:!MD5:!PSK:!SRP:!DSS:!AECDH:!ADH:@STRENGTH
ssl_prefer_server_ciphers = yes
ssl_dh_parameters_length = 2048
Spamassassin
SpamAssassin est un logiciel libre mené par la Apache Software Foundation, auteur du très célèbre serveur Web Apache HTTP Server. Le but de ce logiciel est de filtrer le trafic des courriels pour éradiquer les courriels reconnus comme pourriels ou courriels non sollicités.
# vim /etc/postfix/master.cf
smtp      inet  n       -       -       -       -       smtpd
   -o content_filter=spamassassin
submission inet n       -       -       -       -       smtpd
   -o content_filter=spamassassin
spamassassin unix -     n       n       -       -       pipe
  user=debian-spamd argv=/usr/bin/spamc -f -e /usr/sbin/sendmail -oi -f ${sender} ${recipient}
service postfix reload
Afin de rendre les spams plus visible dans la boite mail, on peut ajouter un header :
# vim /etc/spamassassin/local.cf
rewrite_header Subject *****SPAM*****
report_safe 0
whitelist_from *@domain.tld

add_header all Report _REPORT_
add_header spam Flag _YESNOCAPS_
add_header all Status _YESNO_, score=_SCORE_ required=_REQD_ tests=_TESTS_ autolearn=_AUTOLEARN_ version=_VERSION_
add_header all Level _STARS(*)_
add_header all Checker-Version SpamAssassin _VERSION_ (_SUBVERSION_) on _HOSTNAME_
Activation au démarrage du sustème :
systemctl enable spamassassin.service
service spamassassin start
Ajout de la mise à jour automatique des filtres :
# crontab -e
# Mise à jour des règles de spamassassin
20 02 * * * /usr/bin/sa-update
 Clamv
Clamv
ClamAV is an open source antivirus engine for detecting trojans, viruses, malware and other malicious threats.
apt-get install clamav-milter
service clamav-freshclam stop
freshclam
service clamav-freshclam start
Intégration avec postfix
mkdir /var/spool/postfix/clamav
chown clamav /var/spool/postfix/clamav
dpkg-reconfigure clamav-milter
Réponses
Handle configuration automatically --> yes
User for daemon --> clamav
Additional groups --> laisser le champ vide
path to socket --> /var/spool/postfix/clamav/clamav-milter.ctl
group owner for the socket --> clamav
permissions (mode) for socket --> 666
remove stale socket --> yes
wait timeout for clamd --> 120
foreground --> no
chroot --> laisser le champ vide
pid file --> /var/run/clamav/clamav-milter.pid
temporary path --> /tmp
clamd socket --> unix:/var/run/clamav/clamd.ctl
hosts excluded for scanning --> laisser le champ vide
mail whitelist --> laisser le champ vide
action for "infected" mail --> reject
action on error --> defer
reason for rejection --> Rejecting harmful e-mail: %v found.
headers -> replace
log file --> /var/log/clamav/clamav-milter.log
disable log file locking --> no
maximum log file size --> 50
log time --> yes
use syslog --> no
log facility (type of syslog message) --> LOG_LOCAL6
verbose logging --> no
log level when infected --> off
log level when no threat --> off
size limit for scanned messages  --> 25
support multiple recipients --> no
enable log rotation --> yes
Sélection du miroir le plus proche
# vim /etc/clamav/freshclam.conf
DatabaseMirror db.fr.clamav.net
Mise à jour automatique de la base virale
# crontab -e
15 * * * * /usr/bin/freshclam --quiet
Mappage avec postfix
# vim /etc/postfix/main.cf
smtpd_milters = unix:/opendkim/opendkim.sock, unix:/opendmarc/opendmarc.sock, unix:/clamav/clamav-milter.ctl
Redémarrage pour la prise en compte
service clamav-daemon restart
service postfix reload
Sieve
The Dovecot Sieve plugin provides mail filtering facilities at time of final message delivery using the Sieve (RFC 5228) language. By writing Sieve scripts, users can customize how messages are delivered, e.g. whether they are forwarded or stored in special folders. The Sieve language is meant to be simple, extensible and system independent. And, unlike most other mail filtering script languages, it does not allow users to execute arbitrary programs. This is particularly useful to prevent virtual users from having full access to the mail store. The intention of the language is to make it impossible for users to do anything more complex (and dangerous) than write simple mail filters.
apt install dovecot-sieve dovecot-managesieved
apt install sieverules
apt install sieve

chmod 755 /var/vmail/domain.tld -R
chown vmail:vmail /var/vmail/domain.tld -R
Ajouter un nouveau nom de domaine
Ajout domaine Postfixadmin création compte mail via Postfixadmin
Dkim
DKIM (DomainKeys Identified Mail) est une norme d'authentification fiable du nom de domaine de l'expéditeur d'un courrier électronique. Elle constitue une protection efficace contre le spam et l'hameçonnage.
En effet, DKIM fonctionne par signature cryptographique du corps du message et d'une partie de ses en-têtes. Une signature DKIM vérifie donc l'authenticité du domaine expéditeur et garantit l'intégrité du message. DKIM intervient au niveau de la couche application du modèle OSI, ainsi il constitue une double protection pour des protocoles de messagerie électronique tels que SMTP, IMAP et POP en plus de l'utilisation de ces protocoles en mode sécurisé (POPS, IMAPS).
Ajout du domaine dans les domaines reconnus par openDKIM
# vim /etc/opendkim/TrustedHosts
*.domain.tld
Ajout de la liaison entre la clé de signature et le nom de domaine
# vim /etc/opendkim/KeyTable
mail._domainkey.domain.tld domain.tld:mail:/etc/opendkim/keys/domain.tld/mail.private
Ajout des adresses mails à signer
# vim /etc/opendkim/SigningTable
*@domain.tld mail._domainkey.domain.tld
Création de la clé de signature
mkdir /etc/opendkim/keys/domain.tld
cd /etc/opendkim/keys/domain.tld
opendkim-genkey -s mail -d domaine.tld -b 1024
chown opendkim:opendkim mail.private
cat mail.txt
Redémarrage des services pour prendre en charge les modifications
service postfix  restart
service dovecot  restart
service opendkim restart
DNS
Afin d'utiliser le serveur de mail avec votre nom de domaine, vous devez rajouter les champs suivants :
; webmail
mail IN CNAME 1.2.3.4

; serveur de mail
@ IN MX smtp
smpt.domain.tld IN A 1.2.3.4
@ IN TXT "v=spf1 a mx ip4:1.2.3.4 ~all"
Si vous avez configuré openDKIM (fortement recommandé), il faut ajouter la clé publique dans un champs DNS de type TXT pour le nom de domaine :
mail._domainkey IN TXT "v=DKIM1; k=rsa; p=VOTRE CLE PUBLIQUE"
Serveur de backup MX
Afin que le serveur de mail de backup puisse prendre en charge les mails, il faut ajouter le domaine ainsi que l'ensemble des adresses mails valides dans la configuration de Postfix.
# vim /etc/postfix/main.cf
relay_domains = $mydestination, domain.tld
# vim /etc/postfix/relay_recipients
mail@domain.tld OK
service postfix restart